Setting up Azure App functions
Deploying them as IaC and implementing continuous integration using GitHub workflows

In the article, we start by discussing Serverless Functions. Then we demonstrate how to use Terraform files to simplify the process of deploying a target infrastructure, how to create a Function App in Azure, the use GitHub workflows to manage continuous integration and deployment, and how to use branching strategies to selectively deploy code changes to specific instances of Function Apps.
What are serverless functions?
Serverless functions are computing services that enable developers to build and run event-driven applications and microservices in the cloud without worrying about the underlying infrastructure. It allows developers to focus on writing small pieces of code, called functions, that can be triggered by various events such as HTTP requests, messages from a queue, or new files in a file system.
These functions are particularly useful for data engineers who need to process data from various sources, transform it, and store it in the desired format. Serverless functions take care of the infrastructure and automatically scale the resources up or down based on demand, making it an ideal solution for processing data in near real-time.
Azure, GCP and AWS offer equivalent solutions for serverless instances called Azure App Functions, Google Cloud Functions and AWS Lambda respectively. In this article, we'll take a closer look at Azure App Functions and explore how data engineers can use it to streamline their workflows.
Scope of this tutorial
On this article we would like to showcase how serverless functions can be implemented in a project. We will touch upon elements like IaC, Serverless functions and CI for production and development environments.
Requirements for the set-up of Azure App functions
Before starting this tutorial, there are a few requirements that you should have in place:
- Azure subscription: You will need an active Azure subscription to create and deploy Azure resources. Your user needs to have contributors access to the subscription. You can expect the costs for this tutorial to be less than 0.02 euros.
- GitHub account: You will need a GitHub account to create a GitHub repository and configure your GitHub Actions.
- Terraform: You will need Terraform installed on your local machine or the machine you will be using to run Terraform commands. You can download and install Terraform from the official website.
- Azure CLI: You need Azure CLI (Command Line Interface) installed on your local machine or the machine you will be using to run Azure commands. You can download and install Azure CLI from the official website.
Target architecture
The following scenario will be considered:
Our application has two environments: production and development. Once our functions are validated in development, we want to promote them to production manually. This allows us to have control over which version of our functions are ready for promotion to production.
Below you will see a diagram with the target architecture about for our app function:
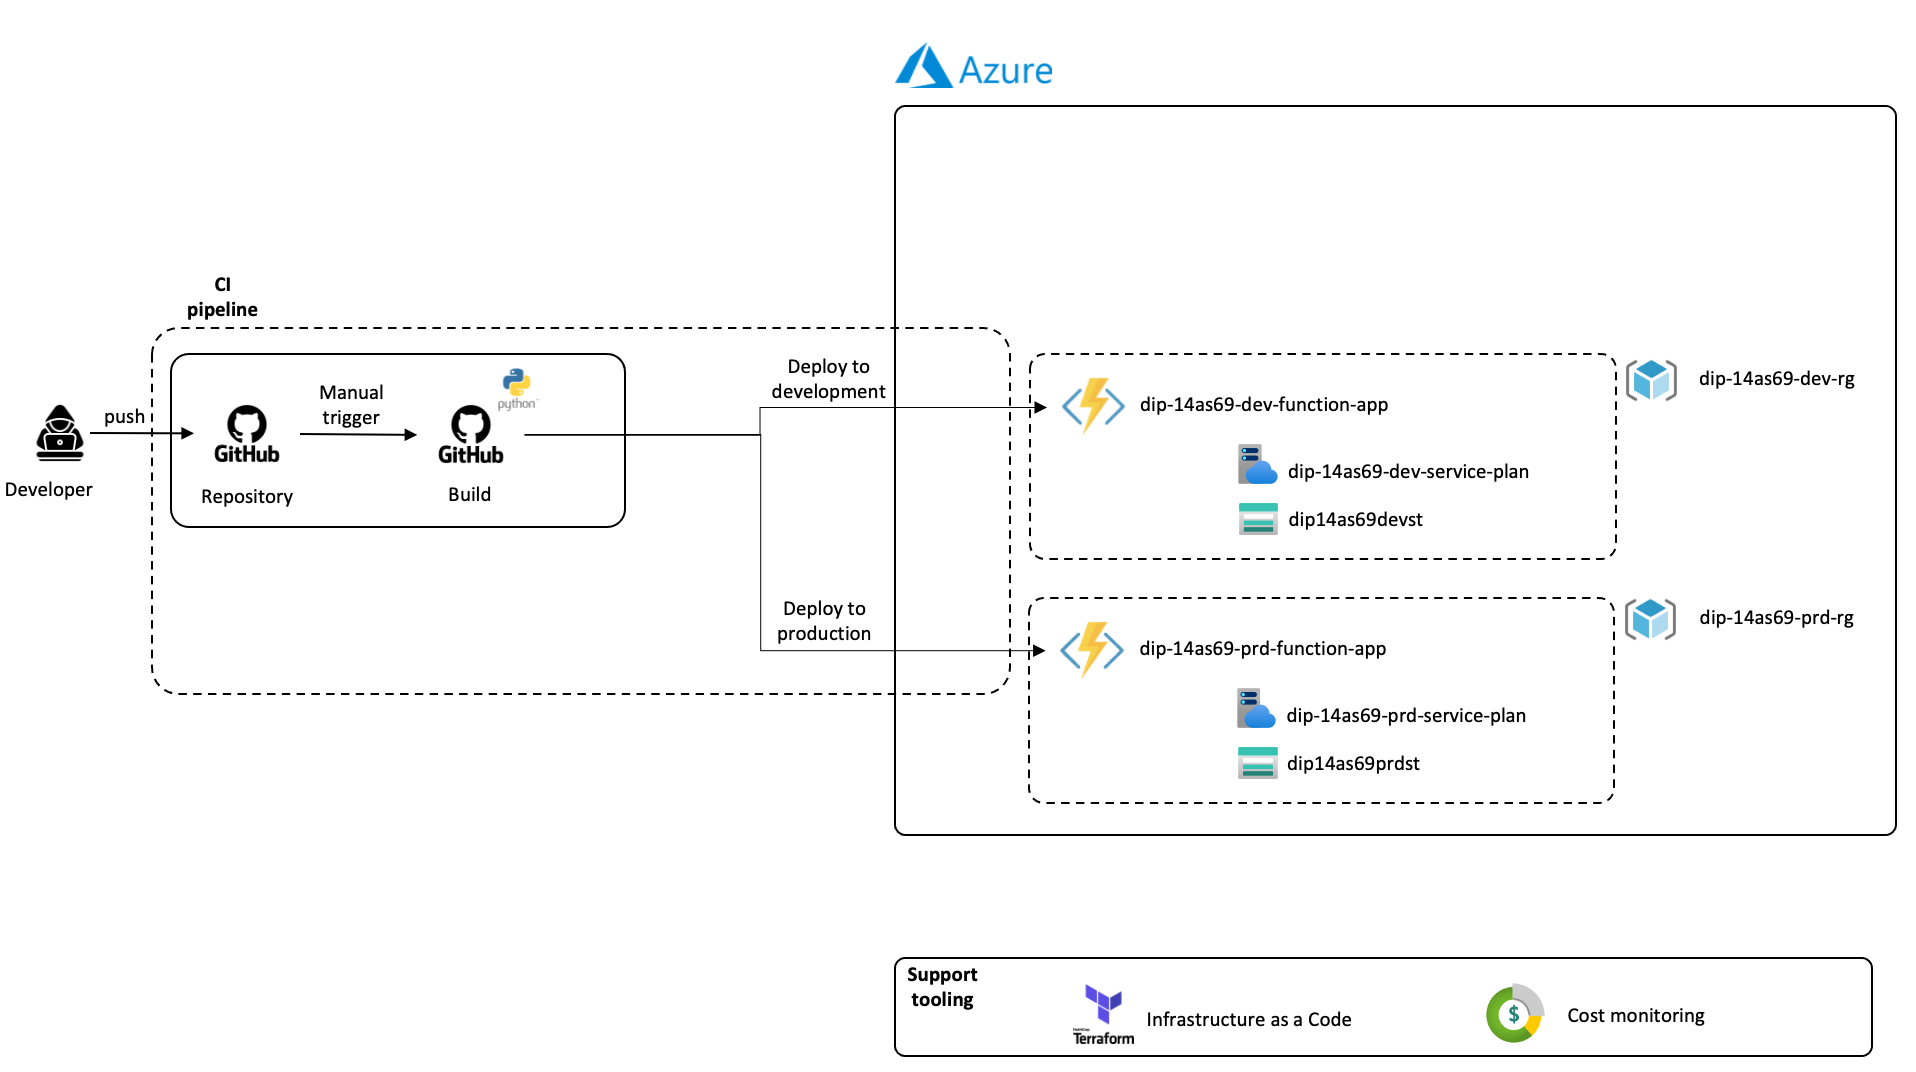
The deployment is manual, this is a choice by design. Another approach could have been to use a third environment called Acceptance and automate an update on new branches starting by feature_* to be deployed on the Development environment. The master branch can be automatically deployed to Acceptance and have the latest tagged branch deployed to the Production environment. But for simplicity of this tutorial, we will use manual triggers.
The code for the IaC, the Azure functions and the GitHub workflows for continuous integration are hosted in this repository.
Infrastructure as code
There are multiple tools to provide infrastructure as code, on this tutorial we will use a simplified configuration on terraform, where we will deploy two resource groups in Azure, one for production and one for development.
Each resource group will contain:
- Azure App Function, the entity where the functions will run.
- Storage account, where functions files will be stored.
- A Service plan, which will define a set of computing resources for a web app to run.
I prepared the terraform configurations for this deployment. You can take a look at them here.
On the terraform file you will find documentation regarding the different blocks of code and which component of the solution they correspond to.
To initiate terraform, execute:
terraform initTo check the components to be deployed by our terraform configuration you can run:
terraform planTo deploy the configuration, execute:
terraform applyDisclaimer: Your application and your infrastructure shouldn’t be on the same repository. It is important to have them separated. But for tutorial purposes we made a simplified version where the infrastructure and the application are on the same repository.
Create Function
Install dependencies
Before you can get started, you should install Node.js which includes npm. This is how you will obtain the Azure Functions Core Tools.
Run the following command to install the Core Tools package:
npm install -g azure-functions-core-tools@4 --unsafe-perm trueCreate an Azure Functions project
In the terminal window or from a command prompt, navigate to an empty folder for your project, and run the following command:
func initYou will be prompted to choose a runtime for the project. Select Python, this will initialize the azure function project with python as runtime.
The basic structure for your function app will be created:
- .funcignore - Declares files that shouldn't get published to Azure. Usually, this file contains .vscode/ to ignore your editor setting, .venv/ to ignore local Python virtual environment, tests/ to ignore test cases, and local.settings.json to prevent local app settings being published.
- .gitignore - Declares files that shouldn't be tracked by git.
- host.json - Contains global configuration options that affect your functions. This file does get published to Azure. Not all options are supported when running locally.
- local.settings.json - Used to store app settings and connection strings when running locally. This file doesn't get published to Azure. To learn more, see local.settings.file.
- requirements.txt - Contains the list of Python packages the system installs when publishing to Azure.
- .vscode/ - Contains store VSCode configuration. You can delete this if you are using a different IDE.
Next to that you could also add:
- venv/ - Contains a Python virtual environment used by local development.
- tests/ - Contains the test cases of your function app. For more information, see Unit Testing.
Create a function
To create a function, run the following command:
func newThis will prompt you to choose a template for your function. We will use HTTP trigger for getting started.
Name your function: my_first_function, a new folder with this function name will be created.
A file callet __init__.py will also be created and it will contain the logic for your function.
The Python v1 model uses a functions.json file to define functions, and the new v2 model lets you instead use a decorator-based approach. This new approach results in a simpler file structure, and it's more code-centric. Unfortunately the v2 model is still under validation and we found out that the local testing still needs more tricks (hidden services to run) in order to work. So for now we will stick with the v1 model.
Run your function project locally
Run the following command to start your function app:
func startThe runtime will output a URL for any HTTP functions, which can be copied and run in your browser's address bar.
To stop debugging, use Ctrl-C in the terminal.
Deployment
Generate deployment credentials
The recommended way for GitHub Actions to authenticate and deploy new versions into Azure Functions is by using a publish profile. It is also possible to do it by using a service principal. In this article, we will use the PUBLISH PROFILE.
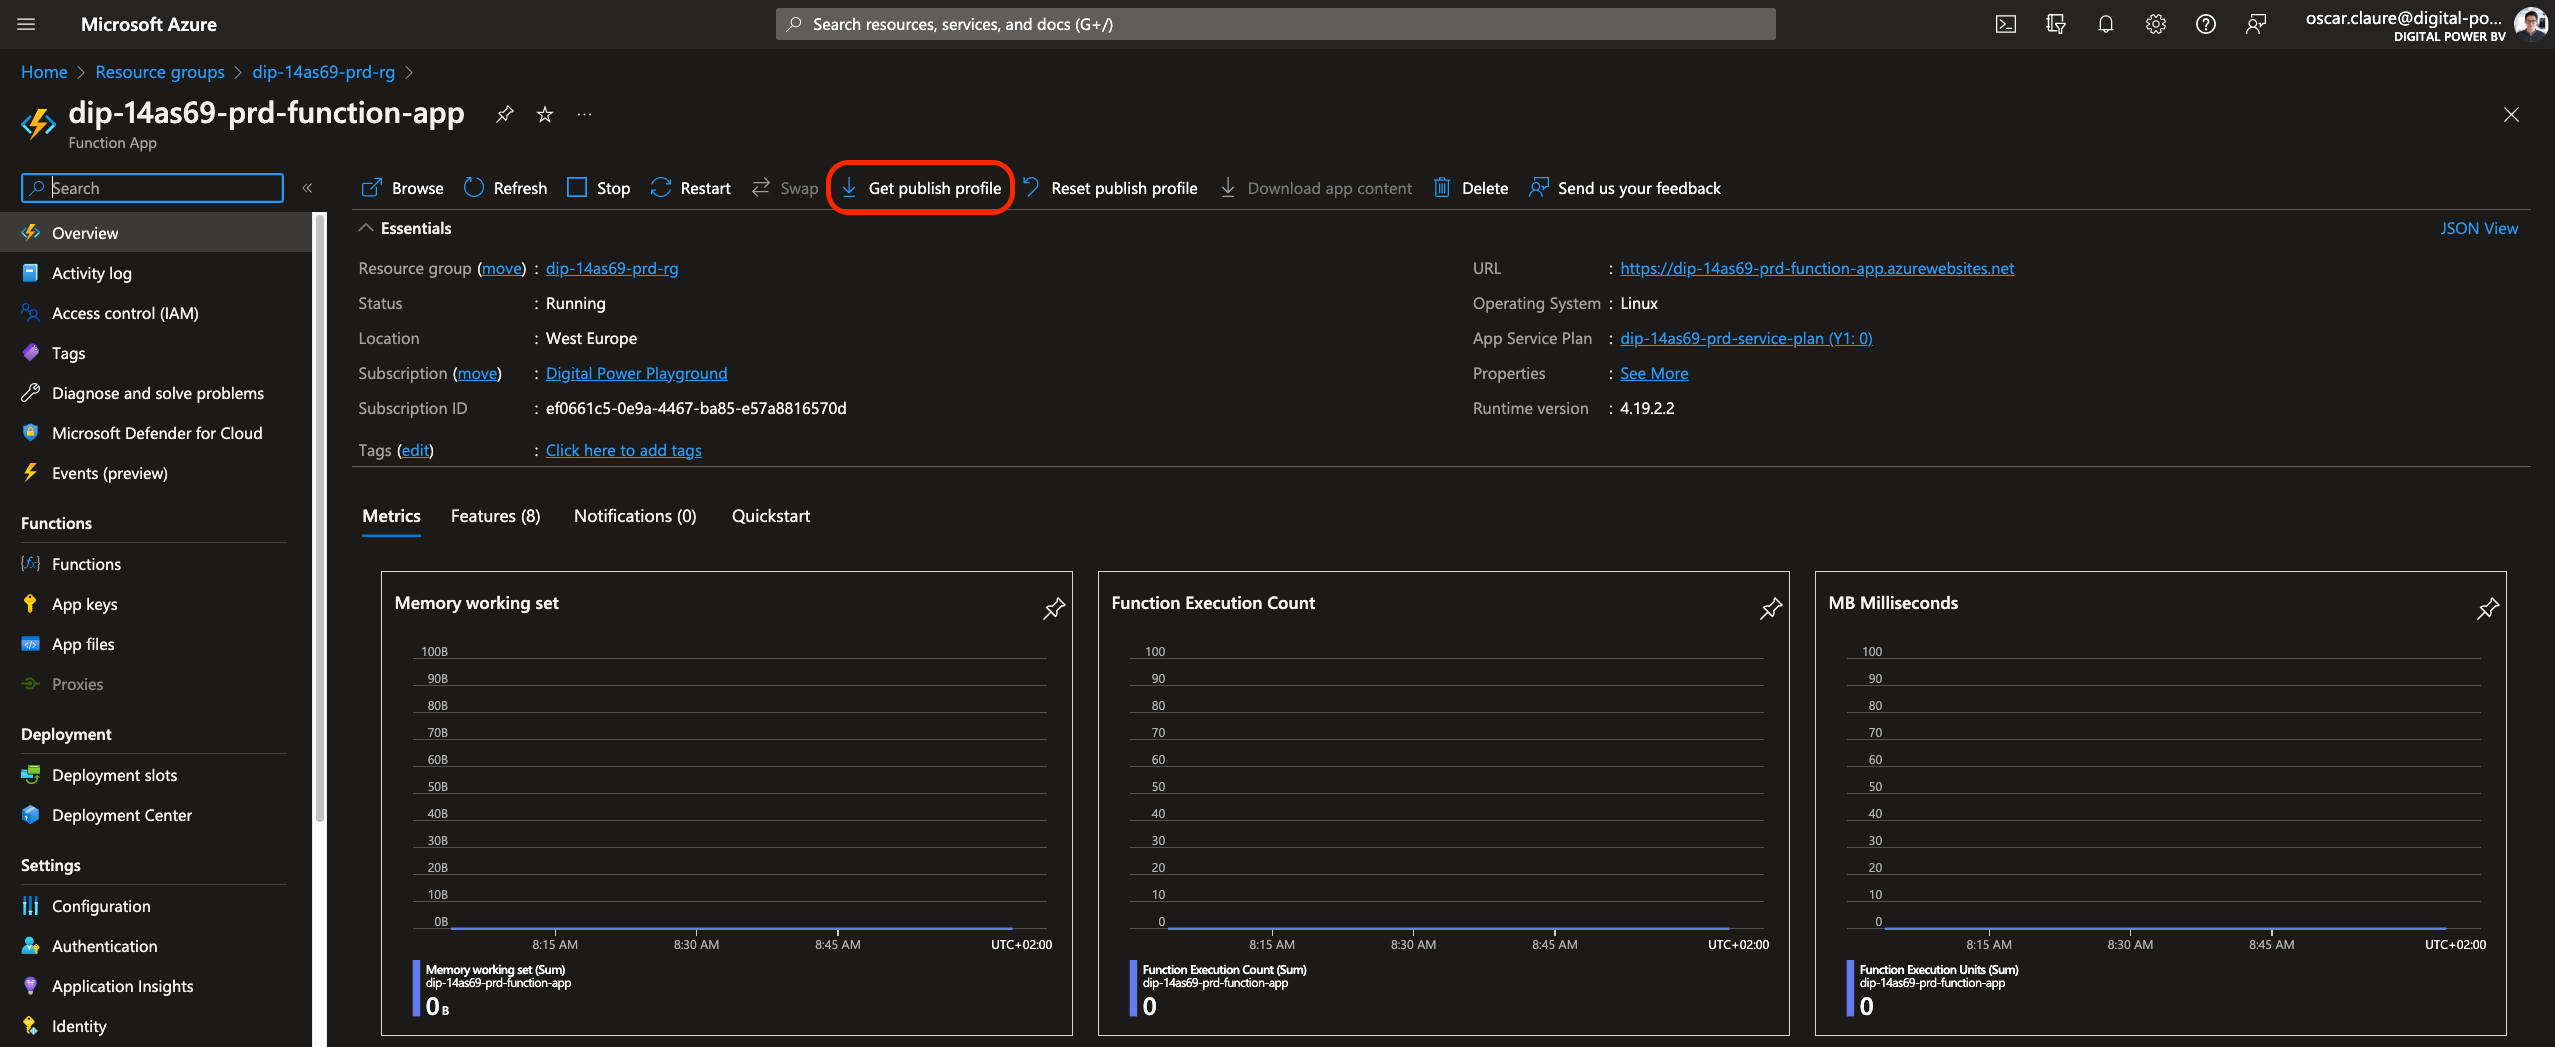
To obtain your publish profile, go to Function App instance then:
- Select the function app's Overview page.
- Select Get publish profile.
- Save and copy the contents of the file.
Create a PRD and DEV environment in GitHub
In GitHub, go to your repository.
- Select Settings à Environments.
- Add a new development environment and name it “dev"
- Add another environment for production and name it “prd”
This will create the dev and prd environments.
Add the GitHub secret
In GitHub, go to your repository.
- Select Settings / Environments
- On the Environment secrets, select “Add secret”.
- Create a new secret with named AZURE_FUNCTIONAPP_PUBLISH_PROFILE and set the value with the content of the prd publishing profile file that you got on the section “Generate deployment credentials”
- Repeat the same steps for the development (dev) credentials.
Github can now authenticate and update the content of your function on your prd and dev Azure function instances.
Create the deployment workflow in GitHub
At the root of your repository create a directory path .github/workflows. Add a file and name it cicd.yml.
Trigger:
name: Build and deploy

on:
  workflow_dispatch:
    inputs:
      deploy-to:
        type: environment
        default: dev

env:
  AZURE_FUNCTIONAPP_PACKAGE_PATH: '.'
  PYTHON_VERSION: '3.9'
  AZURE_FUNCTION_BASENAME: 'dip-14as69'
The "workflow_dispatch" event allows you to trigger the workflow manually from the Actions tab in the GitHub repository. When manually triggering the workflow, you can select the "deploy-to" input which defines the environment where you want to deploy the code: development or production
AZURE_FUNCTIONAPP_PACKAGE_PATH, PYTHON_VERSION and AZURE_FUNCTION_BASENAME are environmental variables defined here and that will be used during the workflow.
There are two configured jobs, Build:
jobs:
  build:
    runs-on: ubuntu-latest
    environment: ${{ inputs.deploy-to }}
    steps:
      - name: Checkout repository
        uses: actions/checkout@v3

      - name: Setup Python version
        uses: actions/setup-python@v1
        with:
          python-version: ${{ env.PYTHON_VERSION }}

      - name: Install dependencies
        run: pip install -r requirements.txt

      # Optional: Add step to run tests here

      - name: Upload artifact for deployment job
        uses: actions/upload-artifact@v2
        with:
          name: python-app
          path: |
            .
- It checks out the repository using the actions/checkout action.
- It sets up a Python environment using the actions/setup-python action and the Python version specified in the PYTHON_VERSION environment variable.
- It installs dependencies specified in the requirements.txt file using the pip install -r requirements.txt command.
- It uploads an artifact containing the code to be deployed using the actions/upload-artifact action. The artifact is named "python-app" and includes all files in the current directory except for those in the venv/ directory.
Overall, the build job prepares the code to be deployed by setting up the Python environment and installing dependencies. It also creates an artifact that can be downloaded and deployed during the deploy job.
The Deploy job:
deploy:
  runs-on: ubuntu-latest
  environment: ${{ inputs.deploy-to }}
  needs: build

  steps:
    - name: Download artifact from build job
      uses: actions/download-artifact@v2
      with:
        name: python-app
        path: .

    - name: 'Deploy to Azure Functions'
      uses: Azure/functions-action@v1
      id: deploy-to-function
      with:
        app-name: ${{env.AZURE_FUNCTION_BASENAME}}-${{inputs.deploy-to}}-function-app
        package: ${{ env.AZURE_FUNCTIONAPP_PACKAGE_PATH }}
        publish-profile: ${{ secrets.AZURE_APP_FUNCTION_PUBLISH_PROFILE }}
        scm-do-build-during-deployment: true
        enable-oryx-build: true
- It downloads the artifact containing the code to be deployed using the actions/download-artifact action. The artifact is named "python-app" and is downloaded to the current directory.
- It deploys the downloaded code to Azure Functions using the Azure/functions-action action.
- Overall, the deploy job downloads the code to be deployed and then deploys the code to the specified Azure Function App and deployment slot using the Azure/functions-action action.
Test the deployment
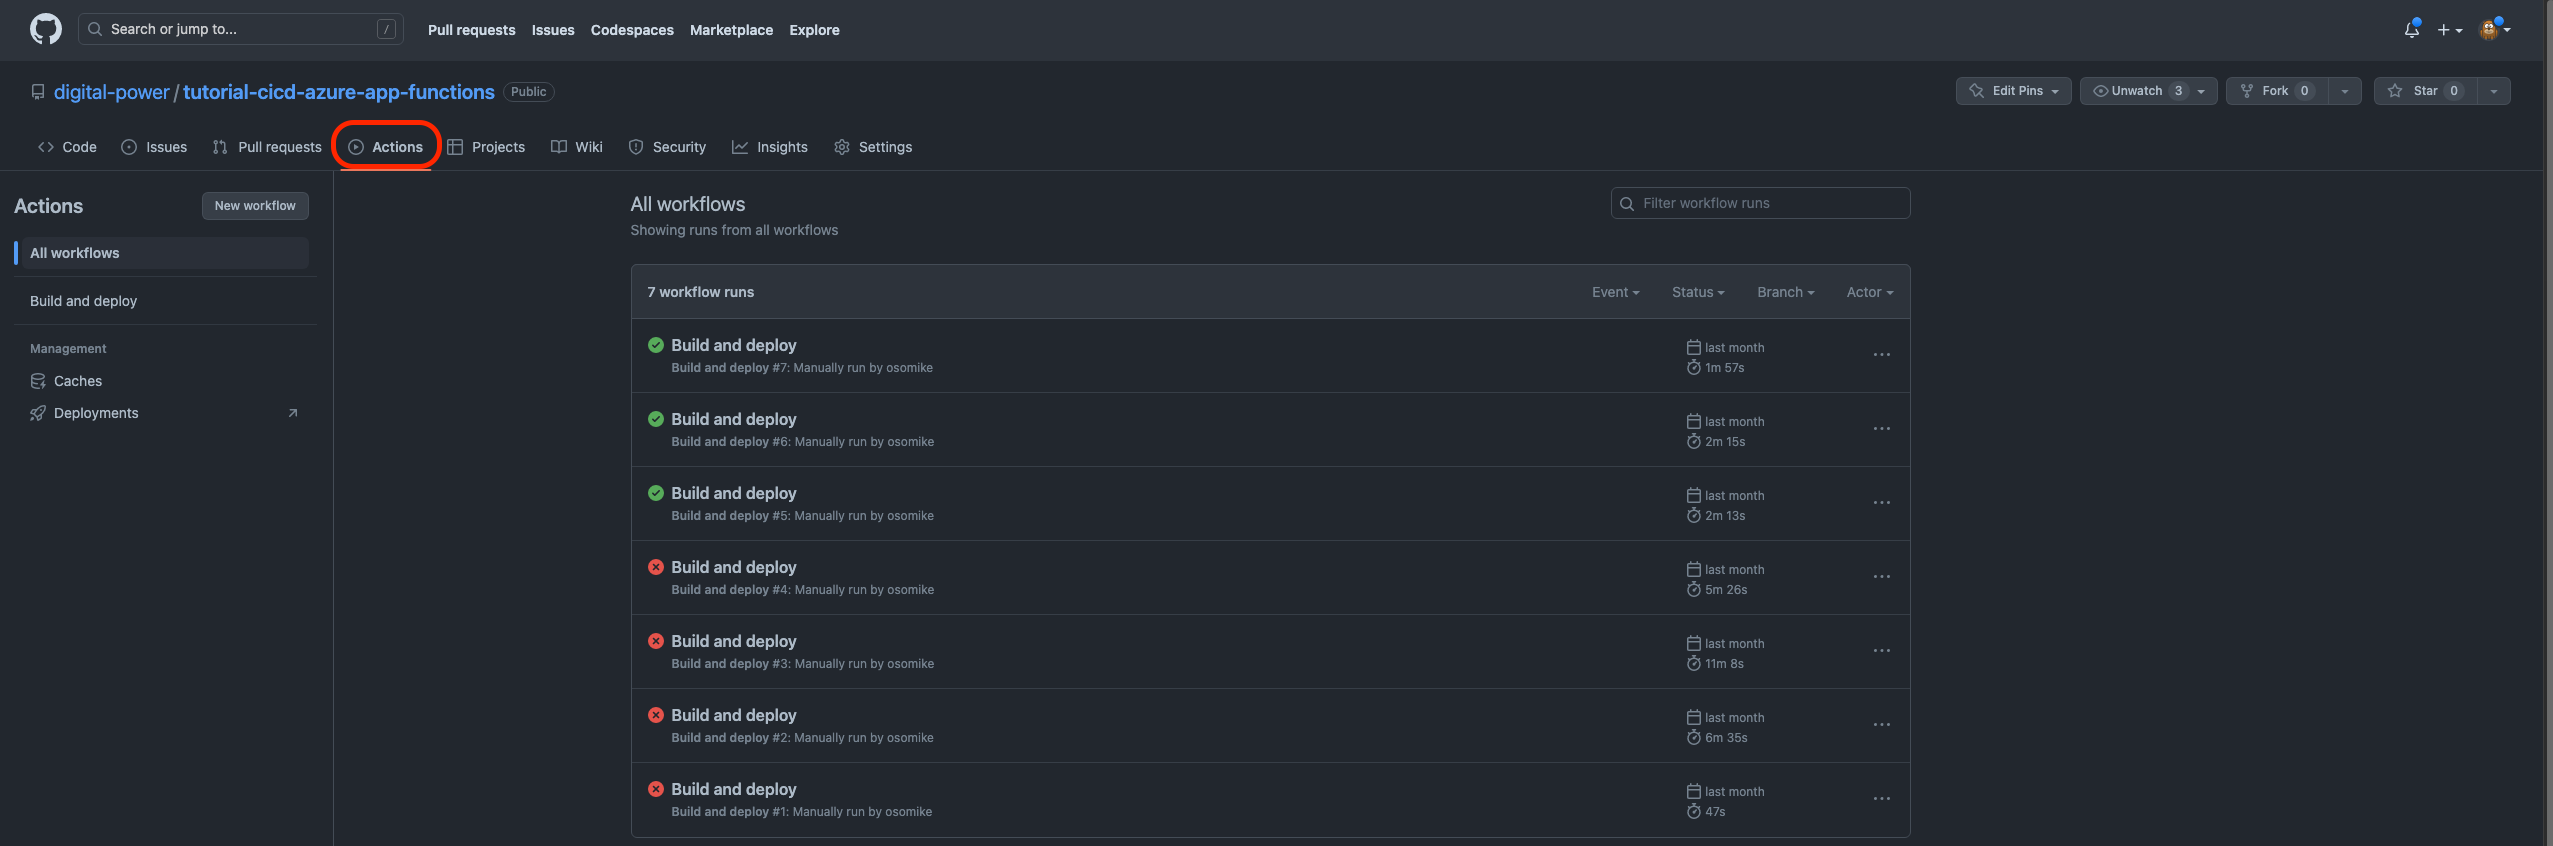
Now it is time to run our deployments, for it go to your repository on GitHub.
1. Go to actions:
2. Then go to Build and Deploy:
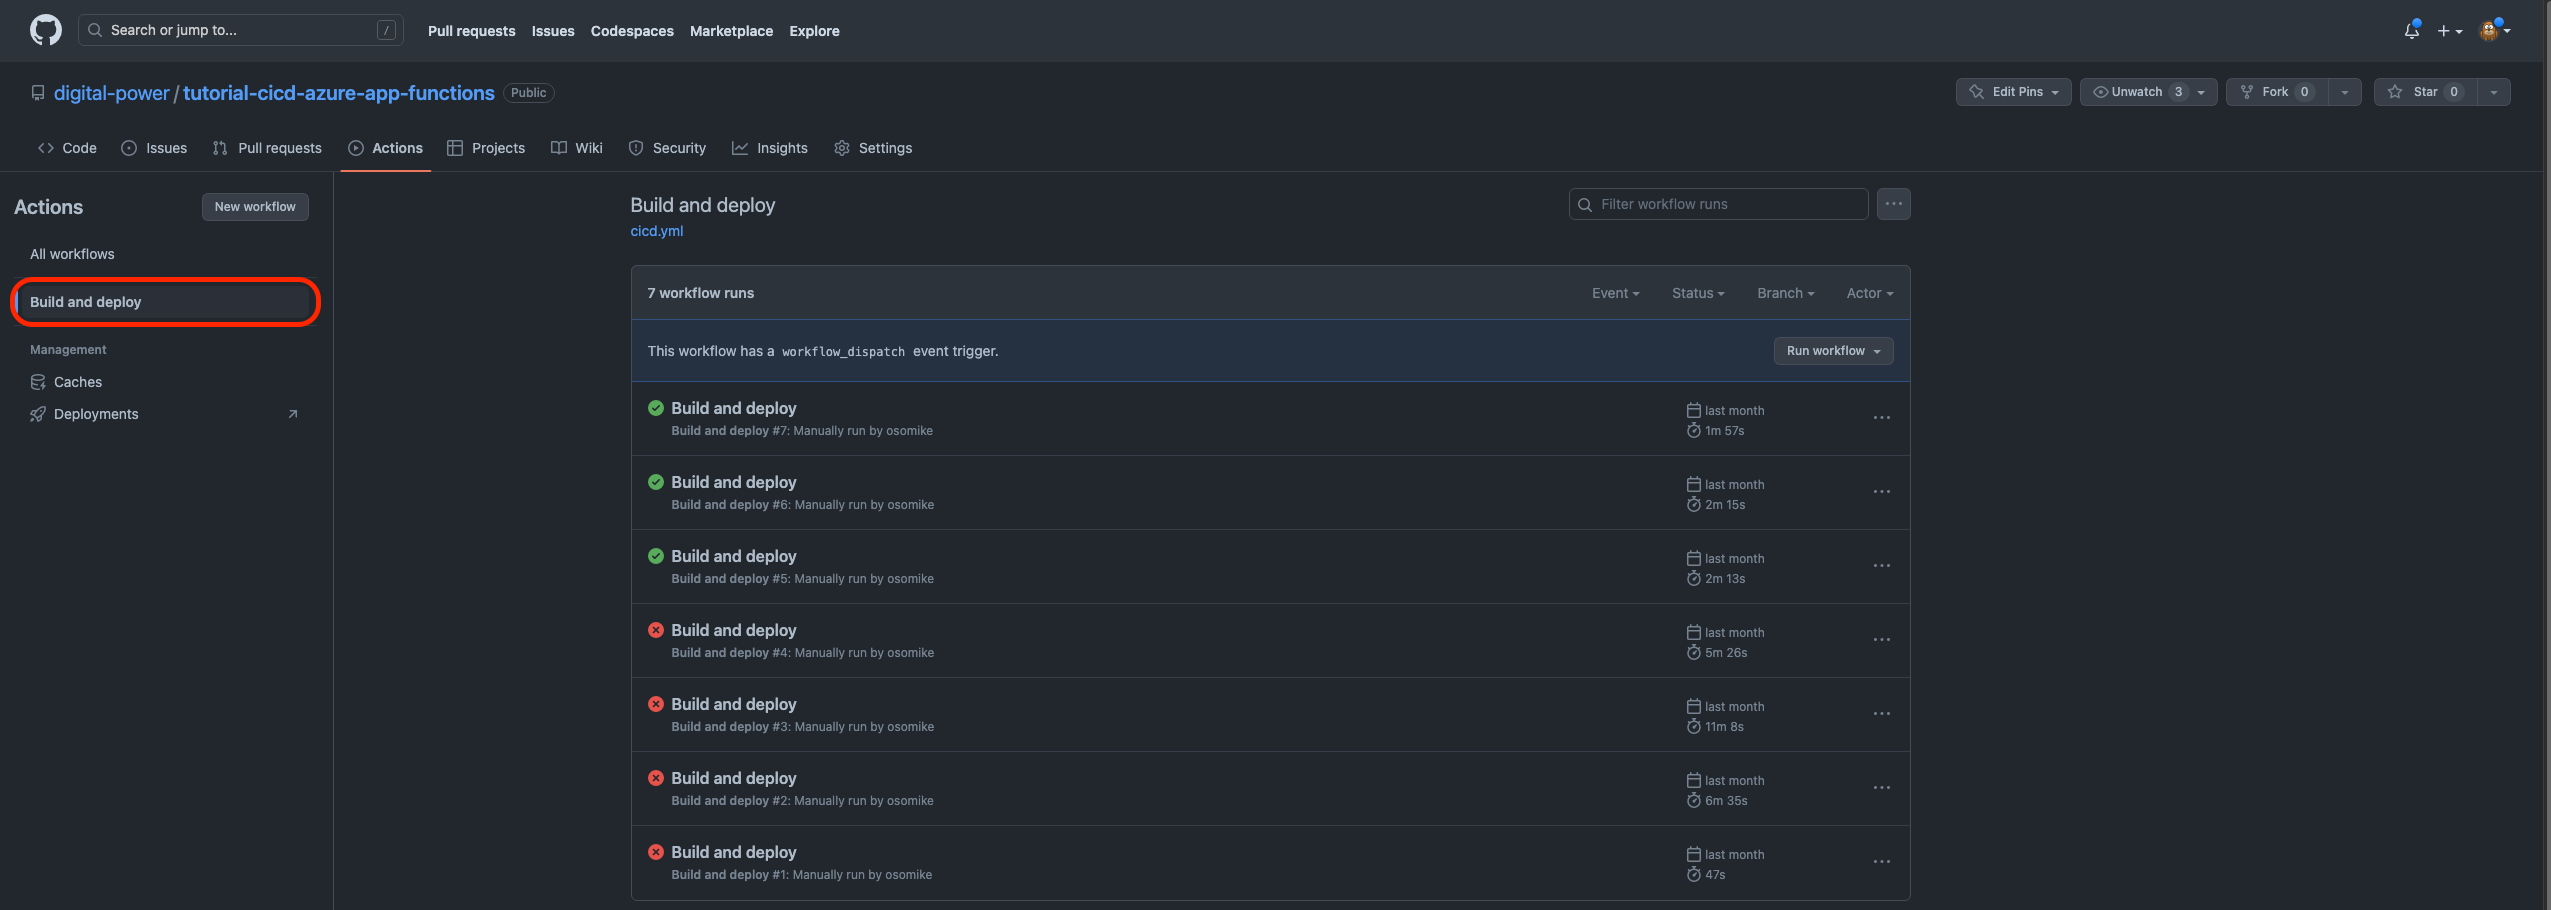
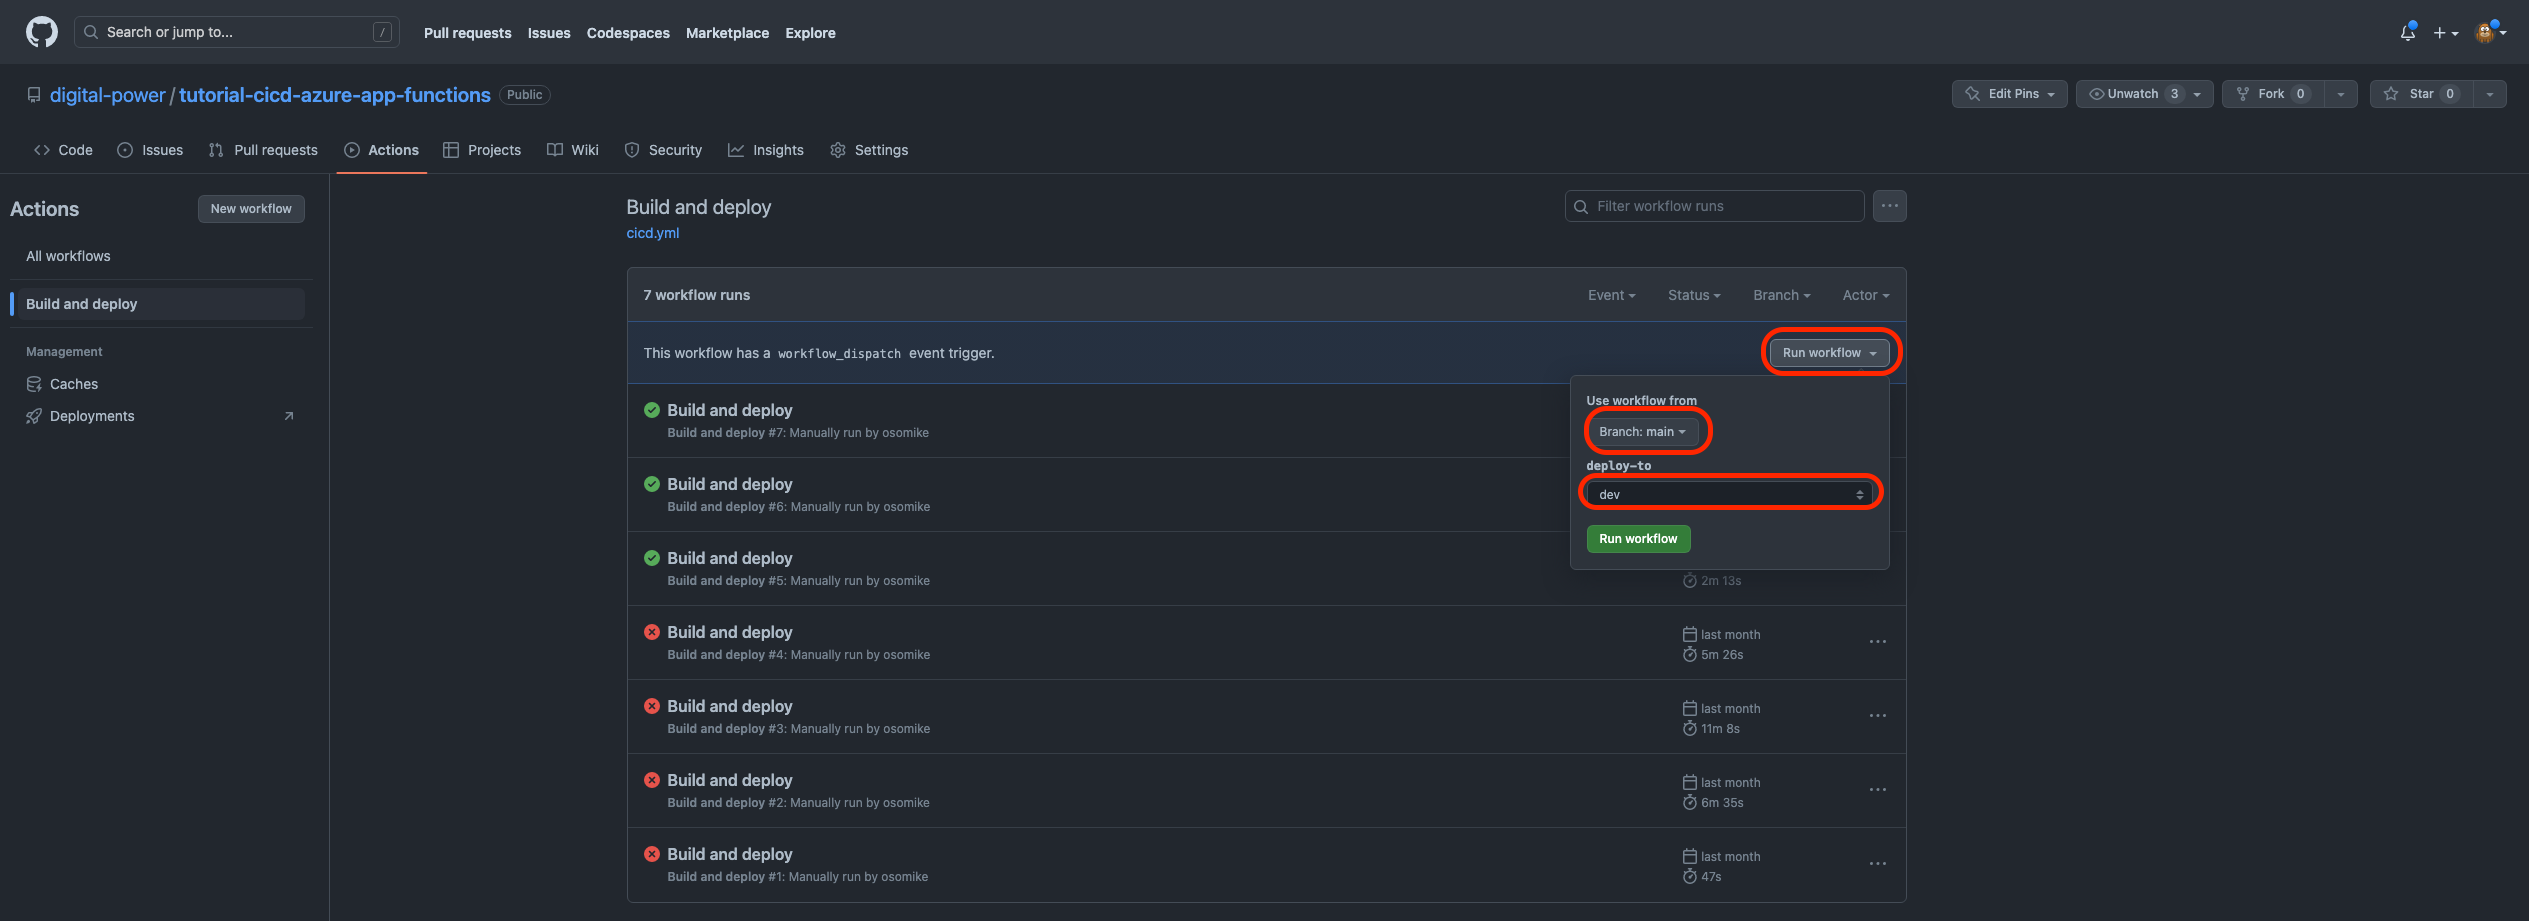
3. Then click Run workflow and select from which branch you want to deploy and the environment to deploy-to:
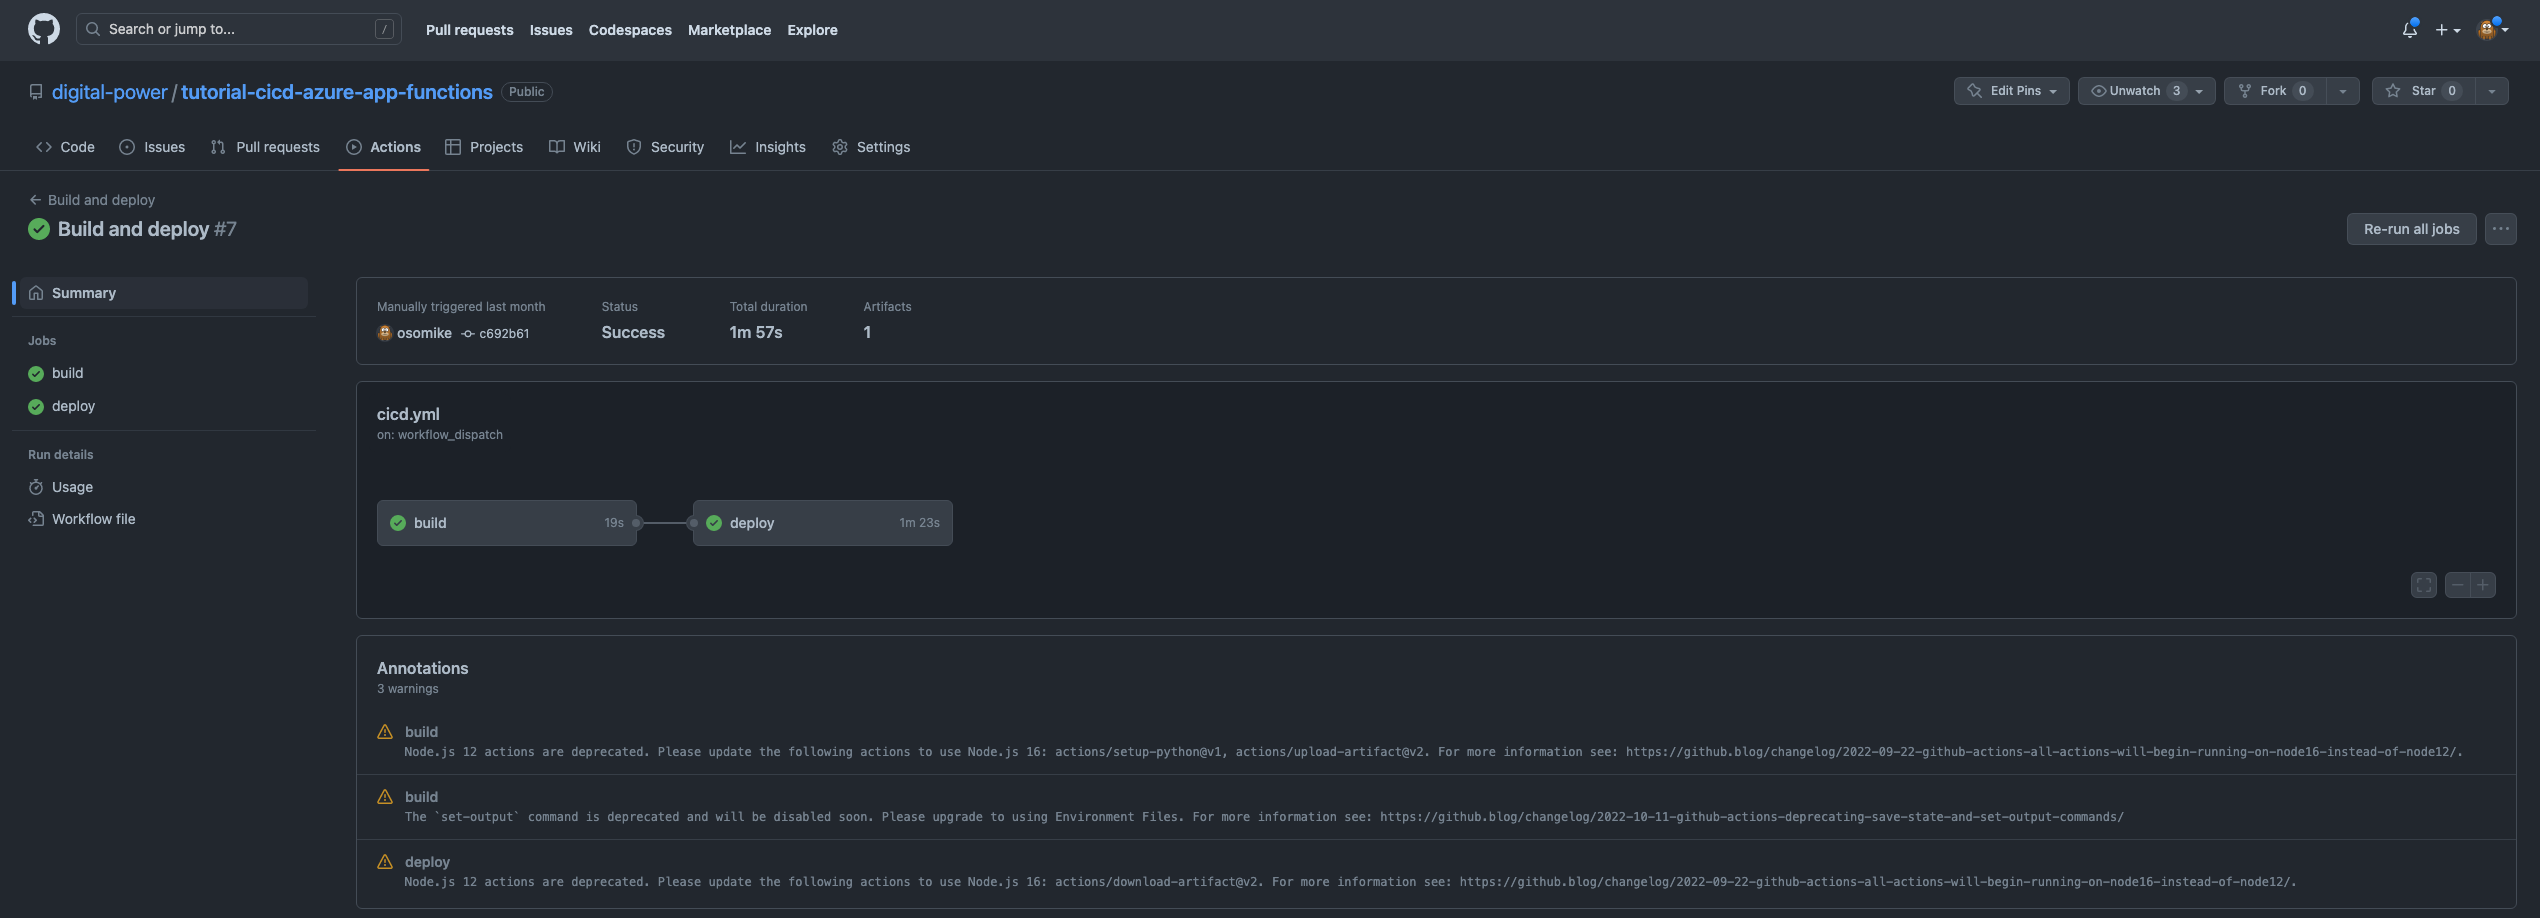
Here the result of both steps, Build and Deploy:
In Azure Portal, go to the PRD or DEV App Function / Functions / my_first_function. And you will be able to see the source code of the function, deployed by the github workflow.
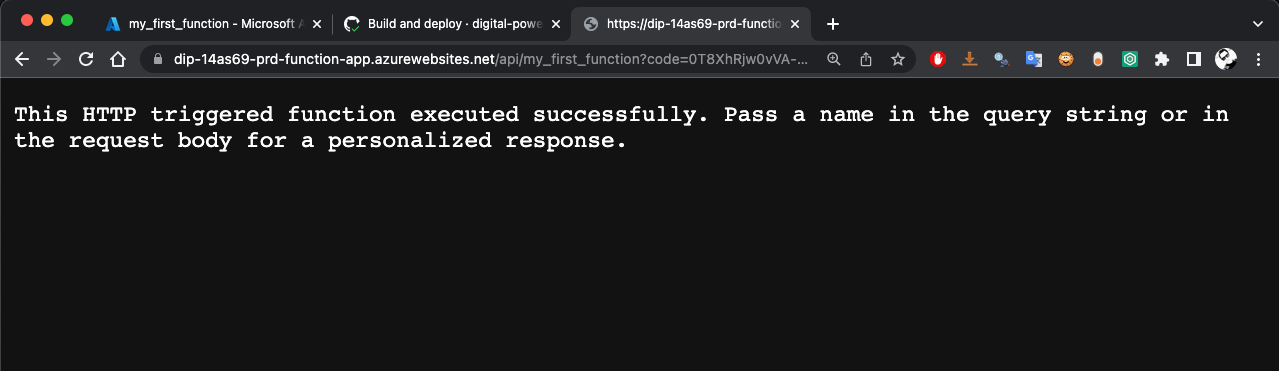
To test your function, you can click on Get function URL from the previous screenshot. Copy the URL and then paste it on a browser. This is what we got from ours:
Conclusion
In this tutorial we demonstrated how Terraform files can simplify the process of deploying a target infrastructure. Additionally, we explored the benefits of using GitHub workflows to manage continuous integration and deployment. Finally, we discussed how to use branching strategies to selectively deploy code changes to specific instances of Function Apps.
These skills can be useful for a wide range of projects, including web applications, IoT devices, and data processing pipelines. Azure Functions are particularly powerful for processing data in near real-time, responding to events, and integrating with other Azure services.
By following these best practices, data engineers can optimize their deployment process, ensure consistent and reliable infrastructure, and ultimately deliver better software to their users.
Want to use this in your daily work? Join our team!
If you are interested in using these techniques in your daily work, we encourage you to check out our current job vacancies. Our team is always looking for talented individuals to join us.
This article was written by Oscar Mike Claure Cabrera, Data Engineer/Data Scientist
Oscar Mike is a Data professional, he enjoys working in hard core Data Analytics teams. With a background in different fields of engineering, he is a T-shaped Data Engineer/Data Scientist with experience in the telecom, manufacturing and aerospace industries.
Receive data insights, use cases and behind-the-scenes peeks once a month?
Sign up for our email list and stay 'up to data':