How do I set up Google Tag Manager?
8 tips when setting up Google Tag Manager

A tag management system such as Google Tag Manager (GTM) enables you to measure visitor behaviour on your website. You can also implement marketing pixels (such as Google Ads and Facebook) and cookie banners via this platform. This article gives you tips to keep in mind when setting up GTM. This allows you to collect reliable and usable data, and you will be less dependent on your web developers.
Tip 1. Learn about the components
- If you are going to work with GTM, it is important to know which components this platform consists of:
- Tags: A tag is a piece of code that runs on a web page or in an app. Most tags send measurement data from your website to third parties, such as Google Analytics (GA).
- Triggers: A trigger specifies when to run a tag. A trigger 'listens' for a certain event, such as a pageview or a click.
- Variables: Variables are used in tags and triggers. Variables in tags capture dynamic values (eg. the order value or an item number on an e-commerce website). Variables in triggers can be used as filters to indicate under which conditions a tag is executed (eg. if you only want to activate a trigger on the homepage).
- Data layer: A data layer is a data structure used to store, process and pass information from your website or app to GTM. You can use this data in tags, triggers and variables.
Do you want to know more about the cooperation between the above components? Read this article. Also look at all the types of tags, triggers and variables within GTM to get a good idea of what is possible.
Tip 2. Think about how many containers you need
Containers hold the tags, triggers, and variables you use for your website. To determine how many containers you need, think about the structure of your websites (if you have multiple websites).
Use a separate container for each website if:
- your websites are quite different in terms of structure & functionality;
- and the measurements you want to set per website also differ.
Use the same container for all websites if:
- your websites are similar in terms of structure & functionality (the main difference is, eg. the language);
- and the measurements you want to set per website are almost the same.
An extra point to consider is the use of iFrames. Do you use iFrames on your website, and do you experience problems with measurements within an iFrame? Then it is recommended to add a separate container to the iFrame source code.
Tip 3. Keep your container(s) clear
Before you create tags, triggers, and variables, come up with a naming convention, as it will come in handy. You can keep your containers organised by adhering to a number of consistent rules regarding naming. For example, you can make all names of GA tags start with 'GA', and all names of data layer variables start with 'DLV'. This article includes a number of options. You can also organise tags, triggers and variables in folders (within GTM). This way, you can immediately see where they belong later.
Tip 4. Create a tag plan
You can choose to create a tag plan where you think about what you want to measure. By creating a tag plan, you can foresee possible obstacles and respond to them. You can process the tags, triggers and variables that you plan to publish in a sheet.
The tag plan may also be intended for your web developers. You can also include any code changes and dataLayer pushes in your plan. A dataLayer push makes it possible to add/update data stored in the data layer.
It is useful to work with your developers to strive for the most stable implementation possible by means of a tag plan. For example, you can choose to use dataLayer pushes as much as possible instead of tagging elements in the Document Object Model (DOM).
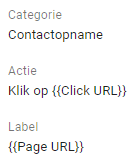
You can add the values for the components of a GA event (eg. a click on a button/link) to the tag plan. Events consist of the following components: category, action, label, and value (optional). For example, if you want to measure clicks on an email address link, the values for these components would look like this:
Tip 5. Create a GA Settings variable
Using the GA Settings variable saves you a lot of time when setting up your GA tags. You only need to create this variable once; after that, you can select this variable in all GA tags.
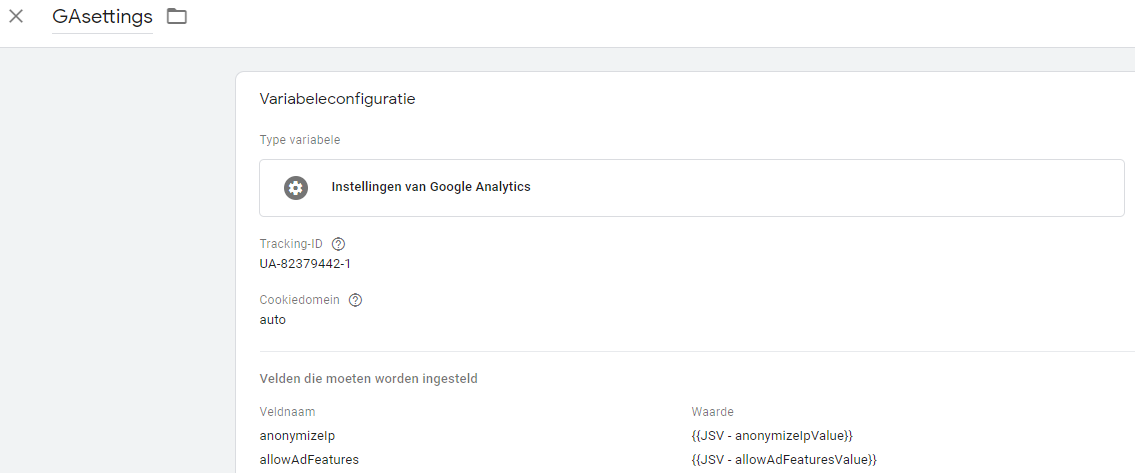
The image below shows how to set this variable. At Tracking ID, enter the tracking code of your GA property.
The value of the Cookie Domain setting is automatically set to auto. This allows all your subdomains (eg. the subdomains 'shop.domain. nl' and 'blog.domain. nl' of the root domain 'www.domain. nl') to use the same GA cookie. If a user goes from 'www.domain. nl' to 'shop.domain. nl', this setting tells GA that it is the same user.
In addition to the fields to set, you can add multiple custom dimensions to this variable. Some of these dimensions are mentioned in our checklist, which you can download at the bottom of this article.
Tip 6. Set temporary tags
Do you want to set a start and end date for your tags? For example, if you have a pixel that belongs to a specific marketing campaign and in advance know exactly from when to when it should be live, then you can do this via the GTM settings. Find out how to do this in our article about the best-hidden feature in GTM because the settings are hard to find:
Tip 7. Make use of Chrome extensions
There are many useful Chrome extensions that you can use to debug your GTM & GA implementation and inspect the collected data.
Our tool Tagbird is very useful when inspecting the data that is being collected. Tagbird allows you to see at a glance which events are being tracked on a page. Download the tool via this link.

Adswerve dataLayer Inspector+ displays all hits sent to GA in the browser's Console. An additional advantage is that dataLayer pushes are clearly visible in the order in which they were pushed.
The dataslayer extension is very handy for debugging the data layer. The advantage of the dataslayer tool is that you can also see which events have taken place on previously visited pages.
Tip 8. Add custom JavaScript
You can use custom JavaScript in your GTM implementation if the default tags, triggers, and variables don't allow you to measure what you want to know. If you are not really familiar with JavaScript, we recommend you take a course first (eg. through codecademy. com or udemy.com).
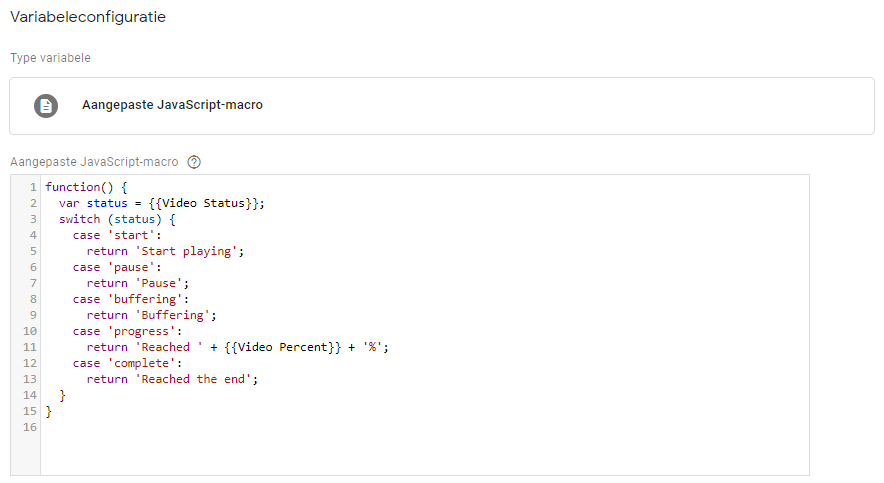
Custom JavaScript can only be added within GTM to a Custom HTML tag or a Custom JavaScript macro. It is important to check (eg. via caniuse. com) whether the different browsers support your JavaScript methods before publishing your changes. FIt is necessary for almost all use cases to support at least Internet Explorer 11.
Below is an example of a Custom JavaScript macro used to measure video interactions on digital-power.com:
Do you need help setting up Google Tag Manager? Our Technical Web Analysts give advice or take your complete web tagging off your hands.
Receive data insights, use cases and behind-the-scenes peeks once a month?
Sign up for our email list and stay 'up to data':